

How To Draw Guide Lines For Face Makeup
In this lesson, we'll look at how to draw a face up and nosotros'll embrace several approaches. We'll begin past exploring the process of drawing a face from the frontal view. In these serial of steps, we'll encompass the general locations of the facial features and larn a few proportional comparisons that yous can apply to ensure that your facial features are in the correct location.
Many people make mistakes when drawing faces considering they don't fully sympathise facial proportions. Proportion refers to the relationship in size and placement betwixt i object and another.
In that location are many formulas that ane can accommodate to depict the facial features in the correct location. In that location's a simple arroyo - one that I showtime learned and is great for beginners. So in that location is the more than complex approach using illustrator, Andrew Loomis' guidelines.
How to Depict a Face from the Front - Step By Step
We'll showtime discuss Loomis' approach, which is more complex, just more authentic. If you find that this approach is a fleck difficult for you, you can skip to the simpler approach further down the page. Remember, either fashion, the goal is to create a convincing drawing of a confront so either approach you take is fine.
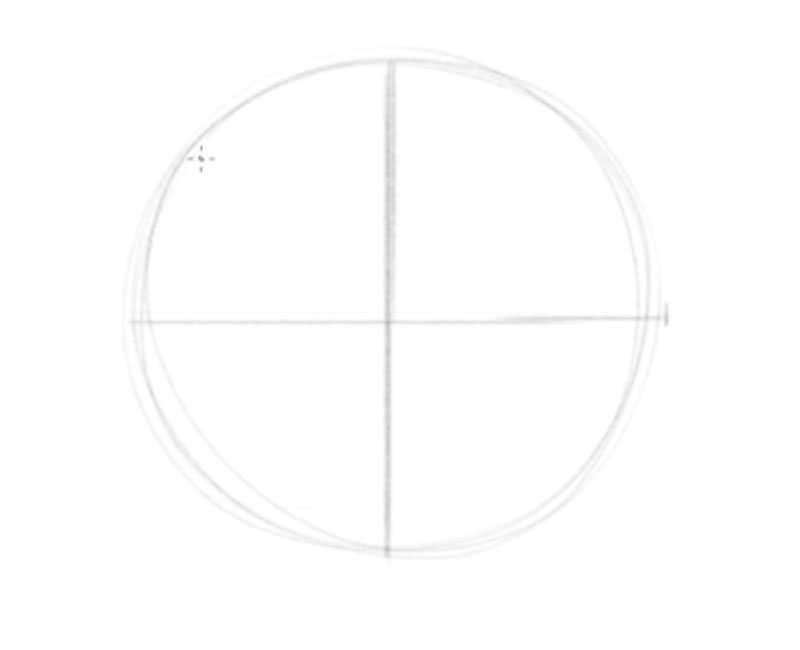
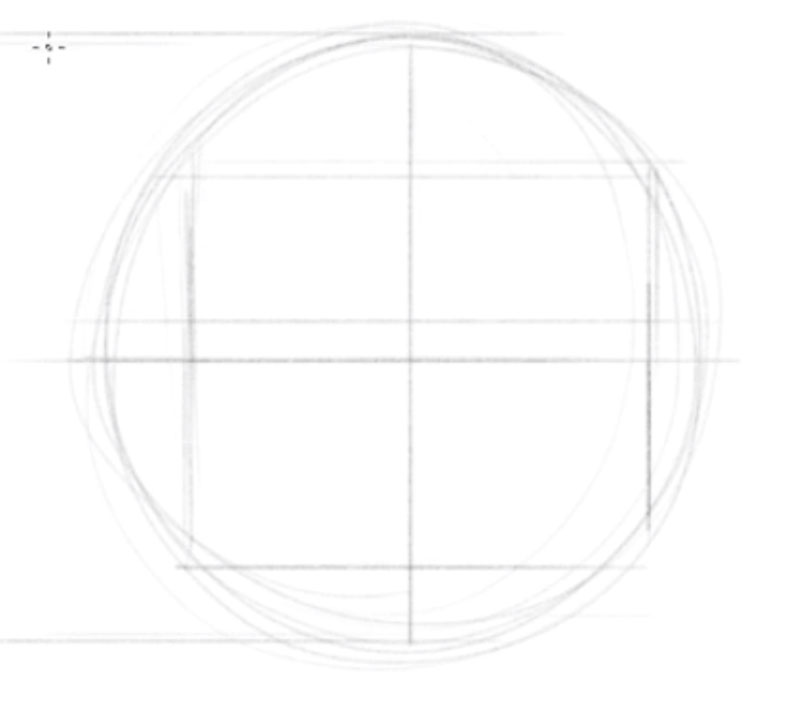
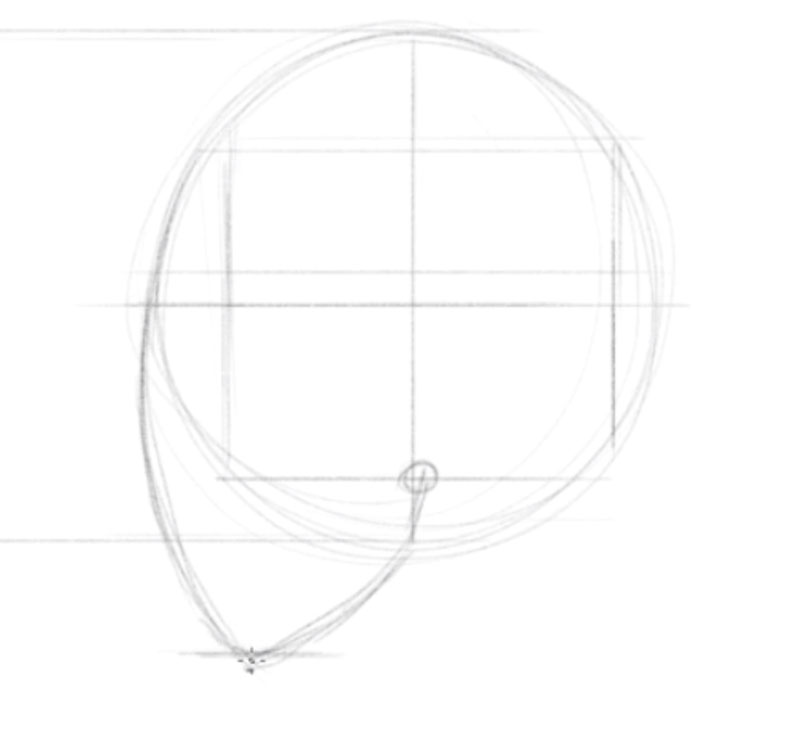
Step ane - Describe a Circumvolve and a Cross
We'll starting time depict a circle with two intersecting lines that connect directly in the center. The circle represents the top portion of the head. We'll use the intersecting lines to determine the locations of the facial features.
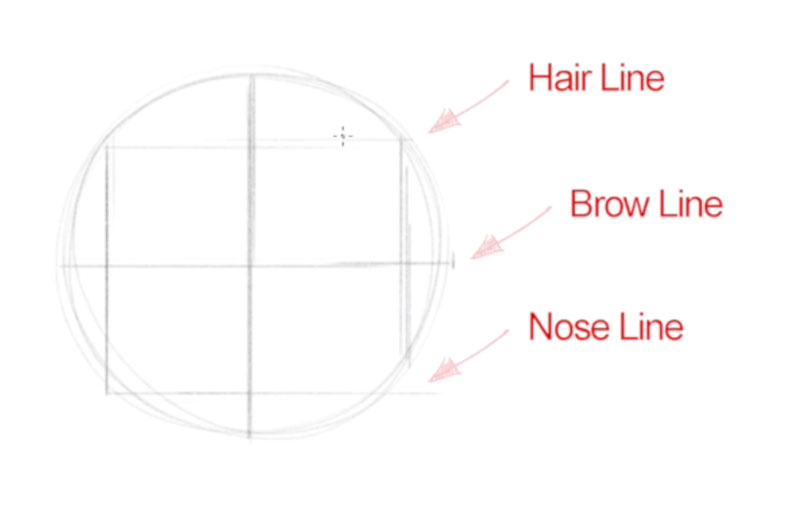
Step 2 - Draw a Foursquare within the Circle
Adjacent, we'll describe a square in which each corner touches the circle. This square volition eventually represent the edges of the face. The top line will eventually go the bottom hairline. The lesser line volition become the nose line, while the center line volition become the brow line.
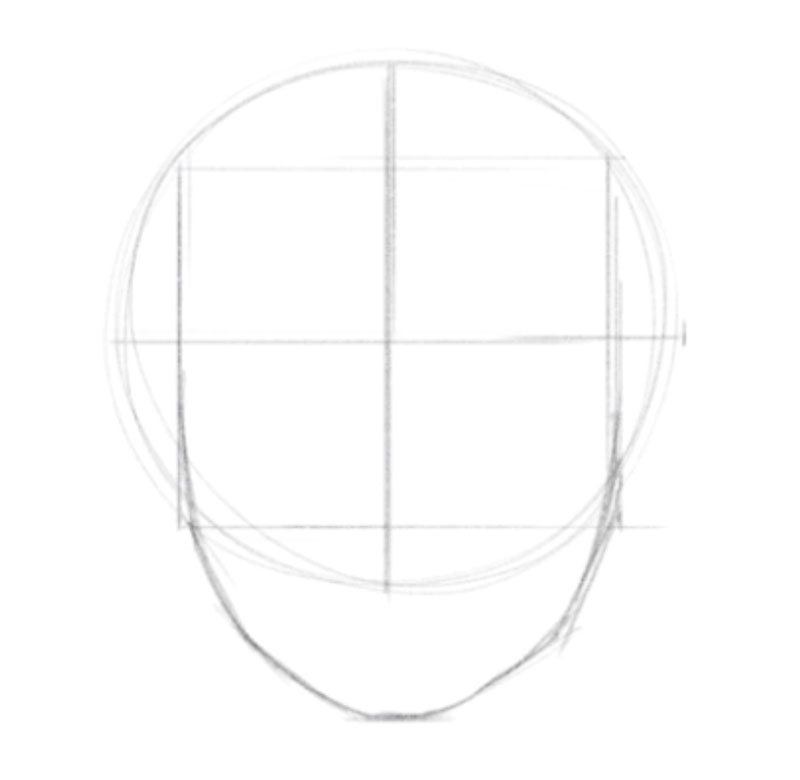
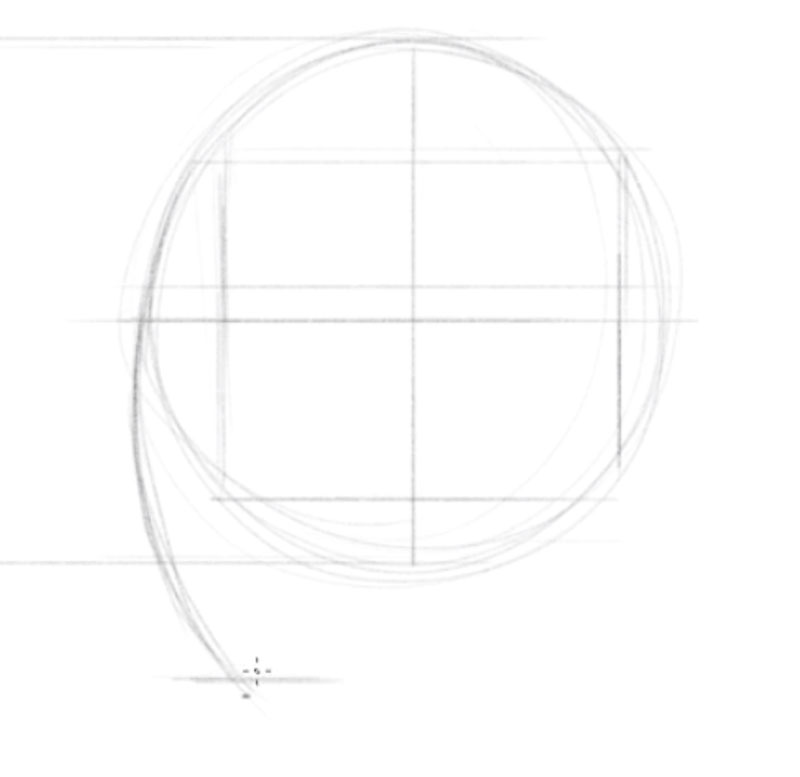
Step 3 - Draw the Chin
Now we'll measure the altitude from the center line to the bottom line. You can use your pencil to do this. From the bottom line of the square, apply this measurement to mark the location of the bottom of the chin. Then, draw the edges of the chin from each side of the square so that they connect at your marked location.
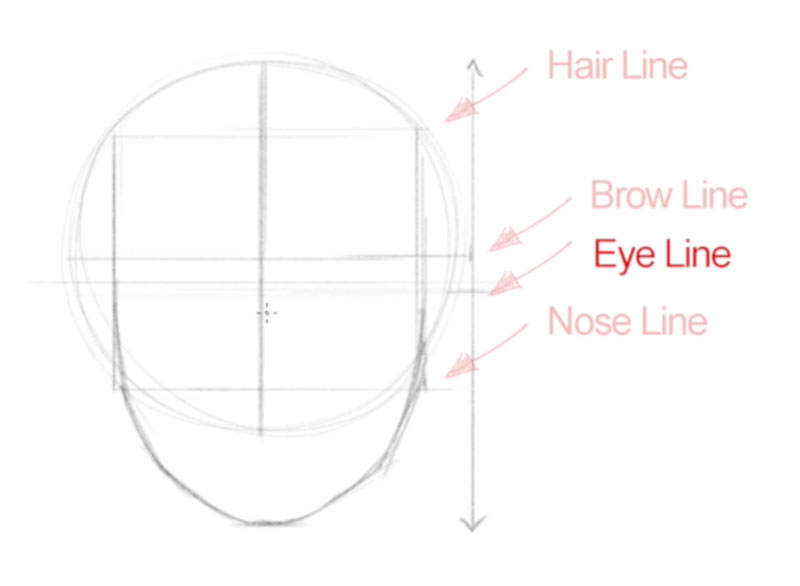
Pace 4 - Locate the Eyes
Now nosotros have the bones structure of the shape of the face up in identify. Nosotros'll next locate the eyes. We can use the height of the head to assistance us determine the location of the eyes on the face up. The optics are more often than not plant on a line in the centre of the head.
The brow line is represented by the eye line that we drew in step one. So we know that the eyes should be found just beneath this line, in the eye of the head. We can describe a line here for the "eye line".
Step 5 - Depict the Optics
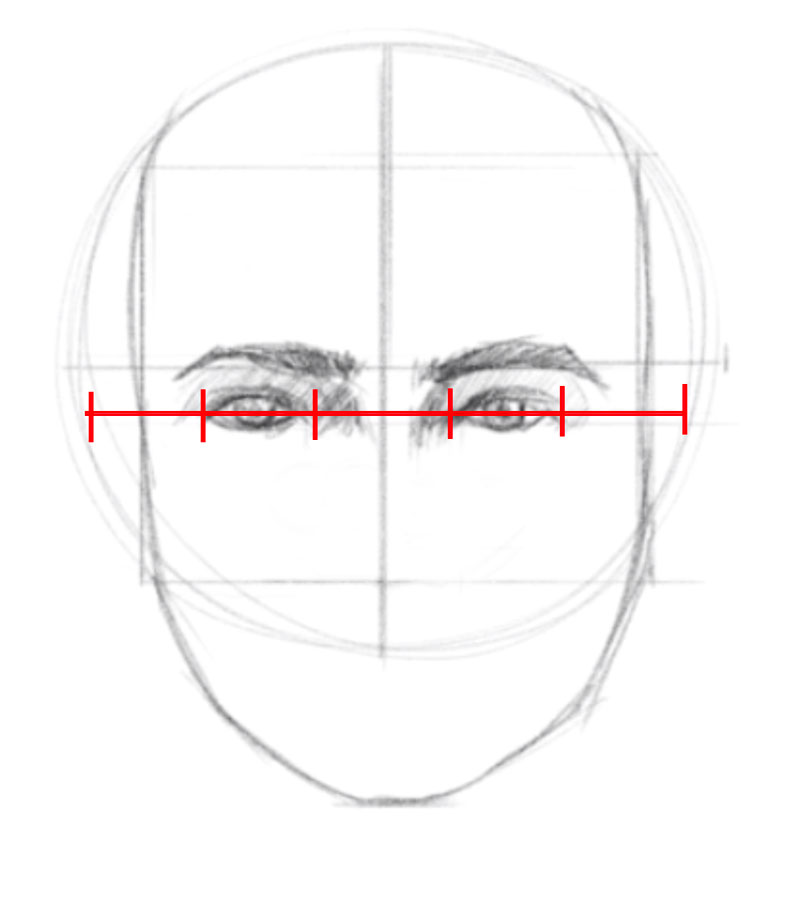
Now that nosotros know where our eyes are located on the face, we can draw them. There's another measurement to keep in listen. We also should consider the width of the optics. The width of the caput, from ear to ear, generally measures the same length of five "eyes". This means that if nosotros want to draw the eyes with accurate proportions, then we need to describe them so that they lucifer this approximate measurement.
Step half-dozen - Locate and Draw the Nose
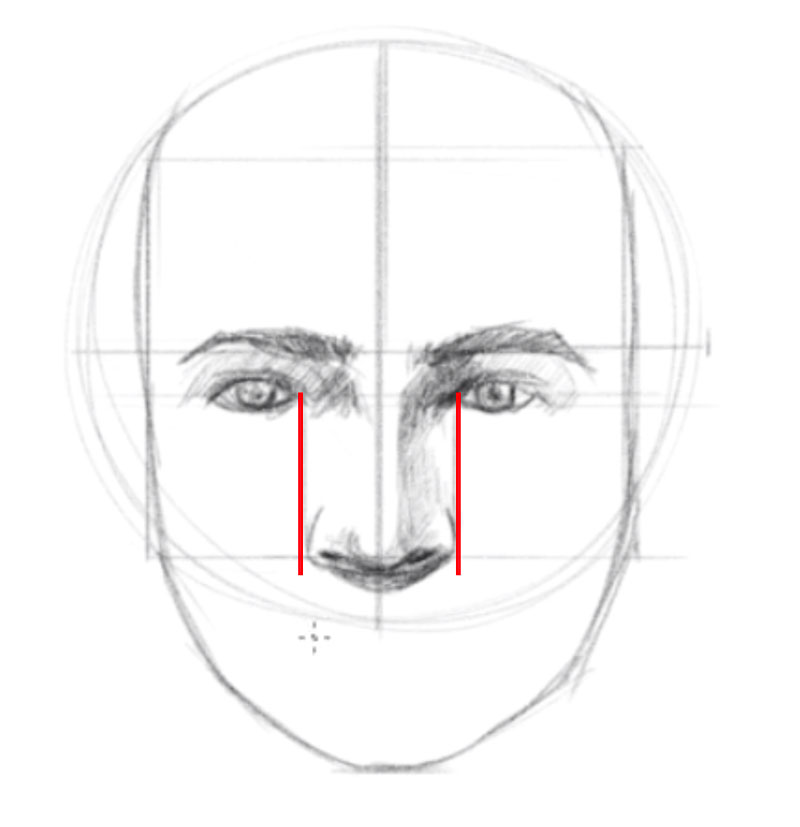
Moving down the face, nosotros'll next depict the nose. The bottom of the nose can be found on the lesser line of the square that we drew in footstep two. The width of the nose varies from person to person, merely is more often than not as broad every bit the inside corners of the optics.
It may exist helpful to draw 2 light lines down from the within corners of the optics to help y'all find the width of the nose.
Pace 7 - Locate and Depict the Mouth
We find the mouth slightly higher than one-half-way between the bottom of the nose and the mentum. Of course, this measurement varies from person to person. We can draw a line to mark the positioning of the mouth.
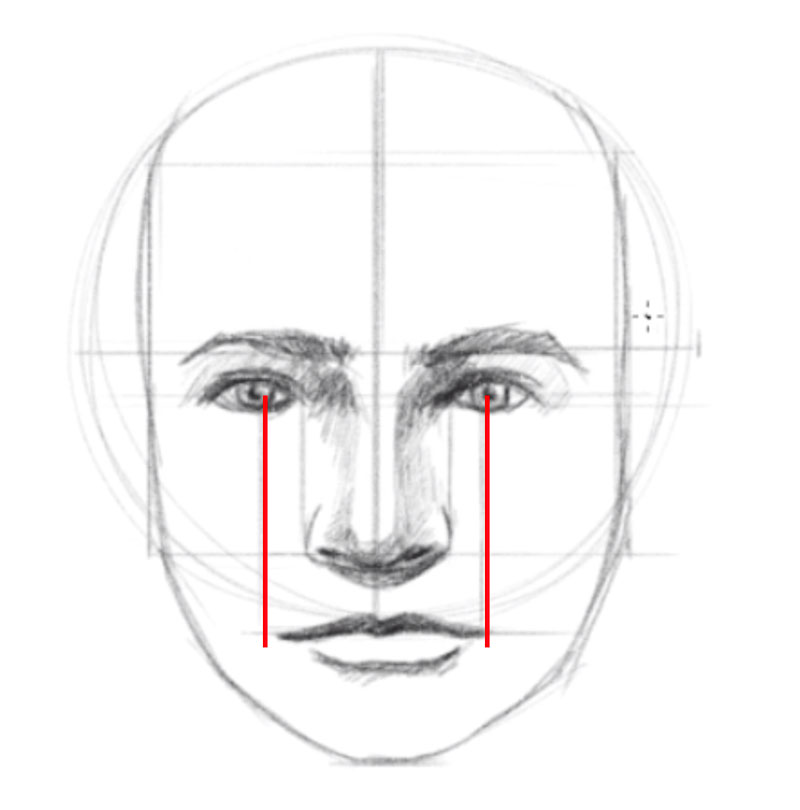
We can employ the eyes to assist us determine the width of the mouth. The corners of the rima oris more often than not align with the inside edges of the pupils. Information technology may be helpful to depict light lines from the pupils to the "rima oris line".
Step 8 - Draw the Ears
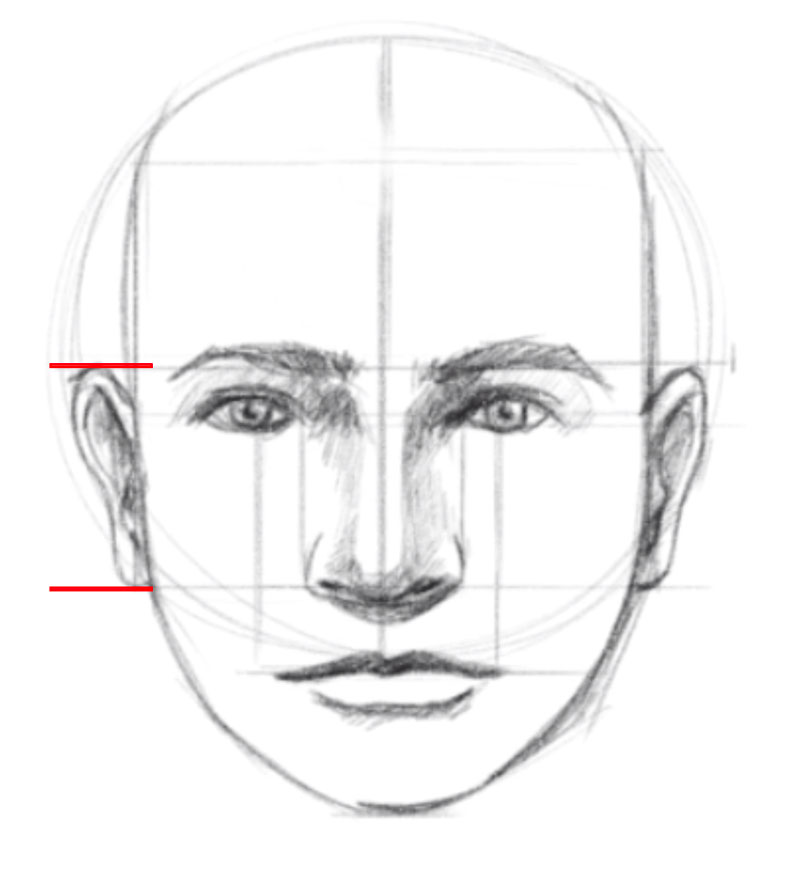
Next, nosotros'll draw the ears. Hither again, we tin can utilize the locations of the features of the face to help united states make up one's mind the location of the ears. The top of the ears will generally marshal with the brow line, while the bottom of the ears align with the nose line.
Go on in mind that the ears come out of the head and extend up slightly. This means that the ears will extend outward from the head, near the heart line.
We've only sketched in a couple of loose ears for this lesson. If you want to take a closer look at drawing an ear, check out this lesson...
- How to Depict Ears
Step nine - Draw the Hairline
Now we'll draw the hairline. If yous're drawing someone that has long pilus that overlaps the forehead, the hairline may not be visible, simply information technology's withal important to know where it'southward located. The hairline is found on the top edge of the square that we drew in stride two.
Hairlines vary greatly from person to person. In this instance, nosotros'll draw a widow's elevation blueprint.
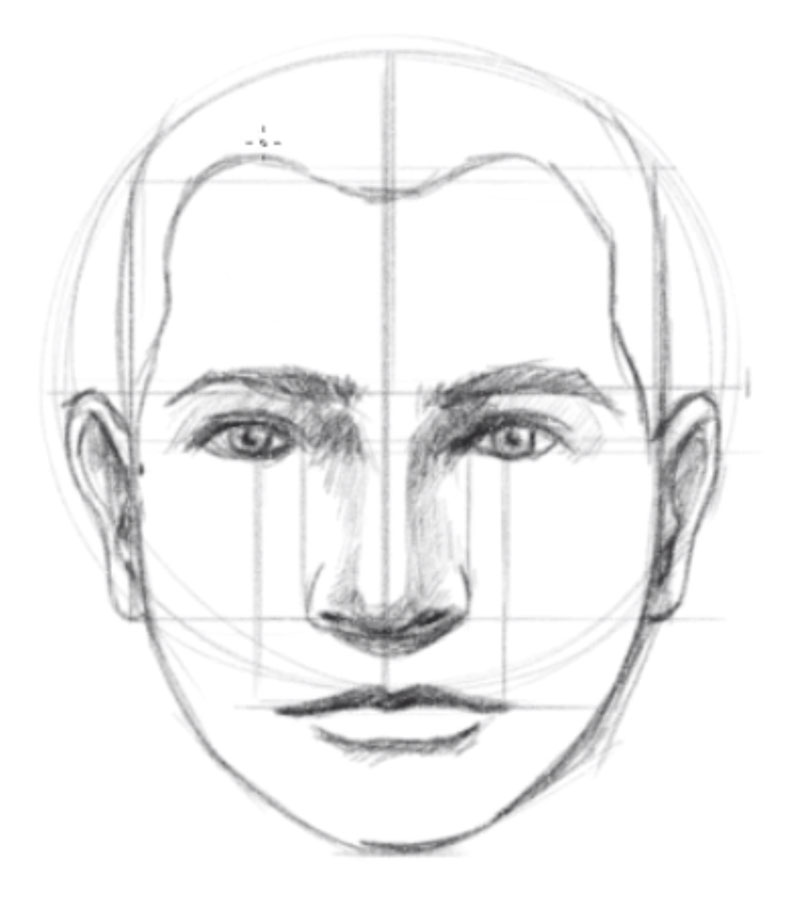
Step x - Depict the Pilus
Now that nosotros take the hairline in identify, we can draw the hair. Shorter hair extends only slightly off of the top of the head, while longer or bushier hair may extend quite a bit. In both cases, nevertheless, the hair extends out from the head and should non be drawn direct on the head.

Desire more instruction on drawing hair? Check out this lesson...
- How to Depict Hair
Step 11 - Add together the Neck
Now we need to add a neck to our floating head. The tendency of virtually first artists is to make the neck too narrow. Generally speaking, the neck extends down from the bottom of the ears. Female person necks are slightly more slender, while the necks of males are broader.
To describe the cervix, nosotros'll simply extend two lines down from the bottom of the ears.
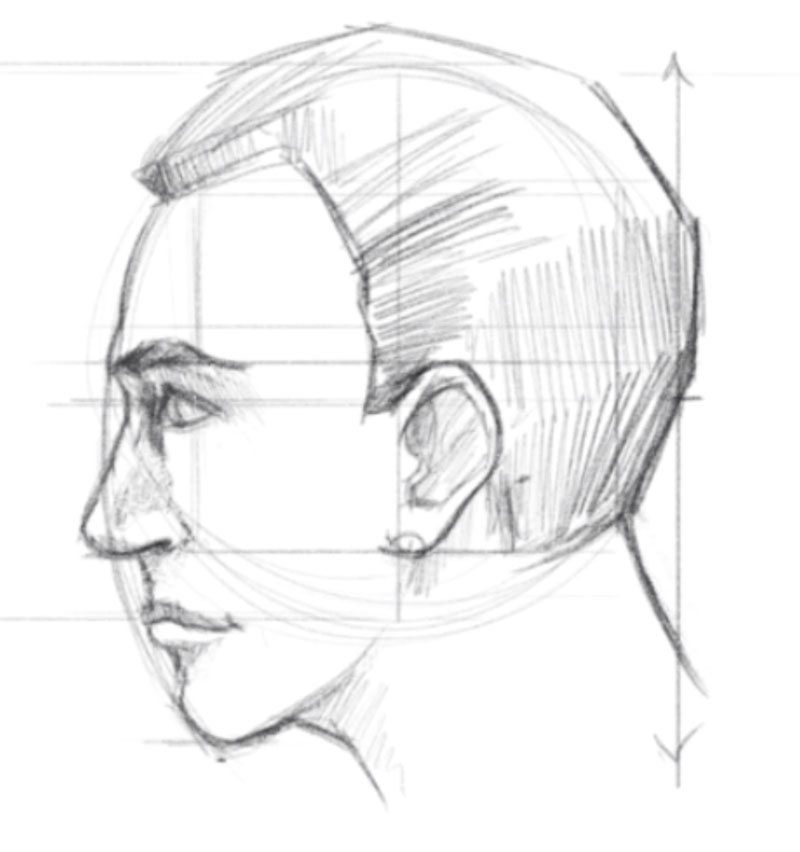
How to Draw a Confront From the Side (Profile)
If you want to describe a confront from the side or profile view, these aforementioned proportional measurements utilise. We'll just alter the location of the features, positioning them on the side of the head.
In fact, we can commencement the process in exactly the same way - starting with a circle with intersecting lines.
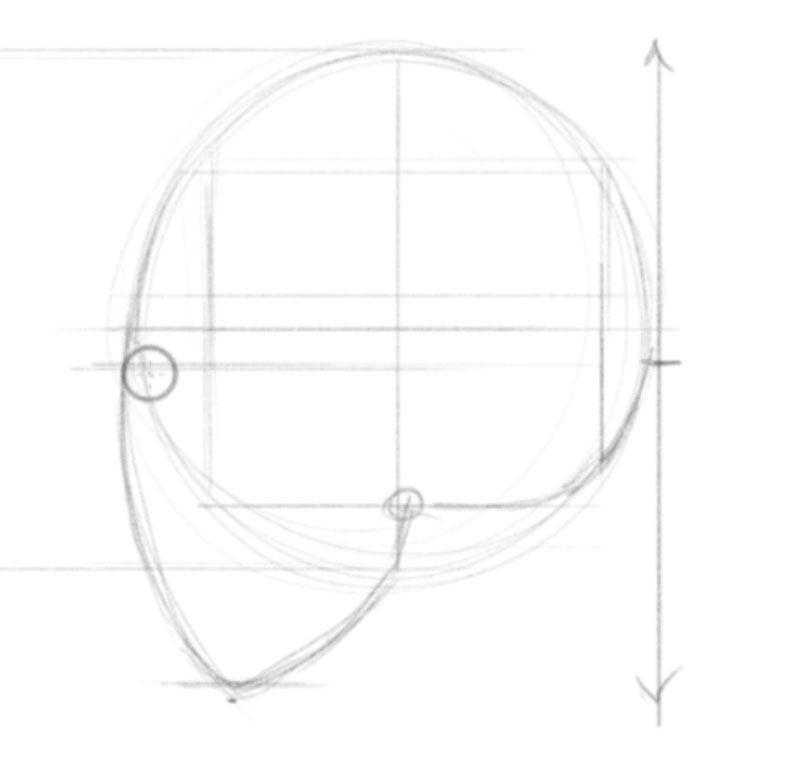
Step 1 - Depict a Circumvolve, a Square, and Intersecting Lines
Nosotros'll starting time in the aforementioned way that we did earlier by drawing a circle, two intersecting lines, and a square that makes contact with the circle at all four corners.
Here again, the top line of our square will become the hairline. The middle line volition become the brow line and the bottom line volition go the olfactory organ line.
Footstep 2 - Draw a Line from the Top of the Head to the Mentum
Nosotros'll adjacent mark the location of the bottom of the mentum. We can measure the distance from the heart of the square to the bottom and apply this measurement to marking the lesser of the mentum.
With a mark in place for the chin, we'll draw the front border of the face. In this example, our discipline is facing to the left, so we'll bring a curved line down from the top of the head to the lesser of the mentum.
Stride iii - Add a Line from the Bottom of the Chin to the Center of the Square
Side by side, we'll describe a line from the bottom of the chin to the center point on the lesser of the foursquare. This line represents the jawline. This line will curve slightly in most cases.
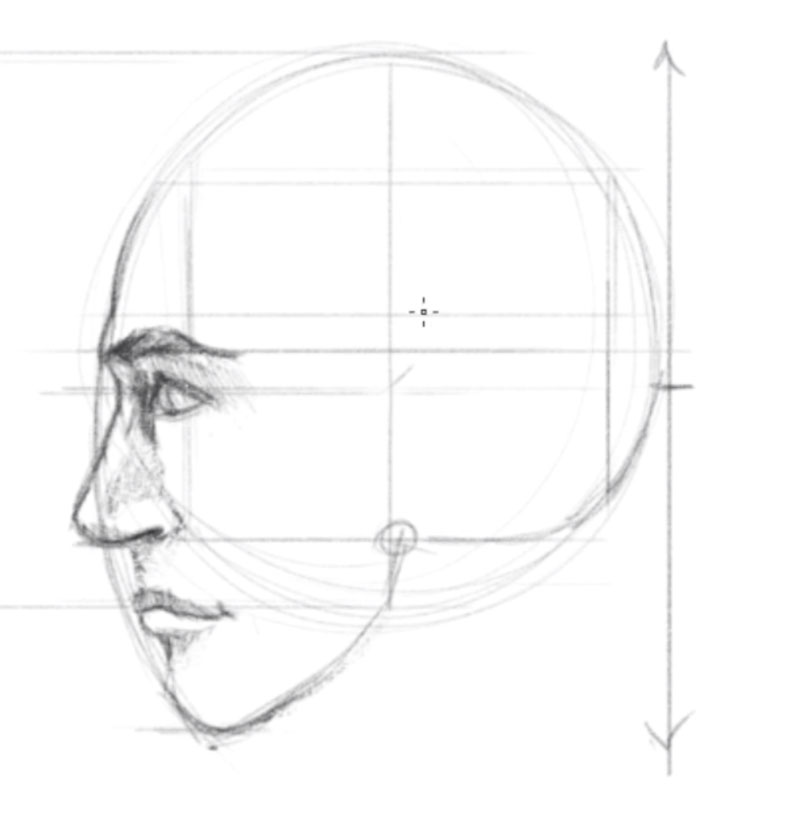
Step 4 - Determine the Location of the Eyes
Now nosotros'll measure to the center of the head and place a line to represent the eye line. Once more, this line should exist drawn merely underneath the brow line.
Nosotros tin can also use the circle that we drew with the bottom of the square to draw the behind of the head. Think virtually the structure of the skull here equally you depict this line.
Step 5 - Draw the Facial Features and Add together Shading
Now that we accept an idea of the location of the facial features, we tin can draw them in using contour lines. Nosotros'll as well add a bit of shading here to make the face take a sense of form.
Find how the eyes are prepare back from the front end border of the face and how the lips and mouth recede at a diagonal towards the neck.
Step 6 - Describe the Ear on the Side of the Face
We tin can use our center line, nose line, and eye line to depict the ear on the side of the face. Since our field of study is facing towards the left, the majority of the ear will be found on the right side of our heart line.
Every bit we discussed before, the line drawn for the ear will kickoff on the eye line, extend up to the forehead line and then bend down, touching the olfactory organ line.
We'll besides go ahead and describe a contour line for the outer edge of the hair and a couple of contour lines for the neck in this step.
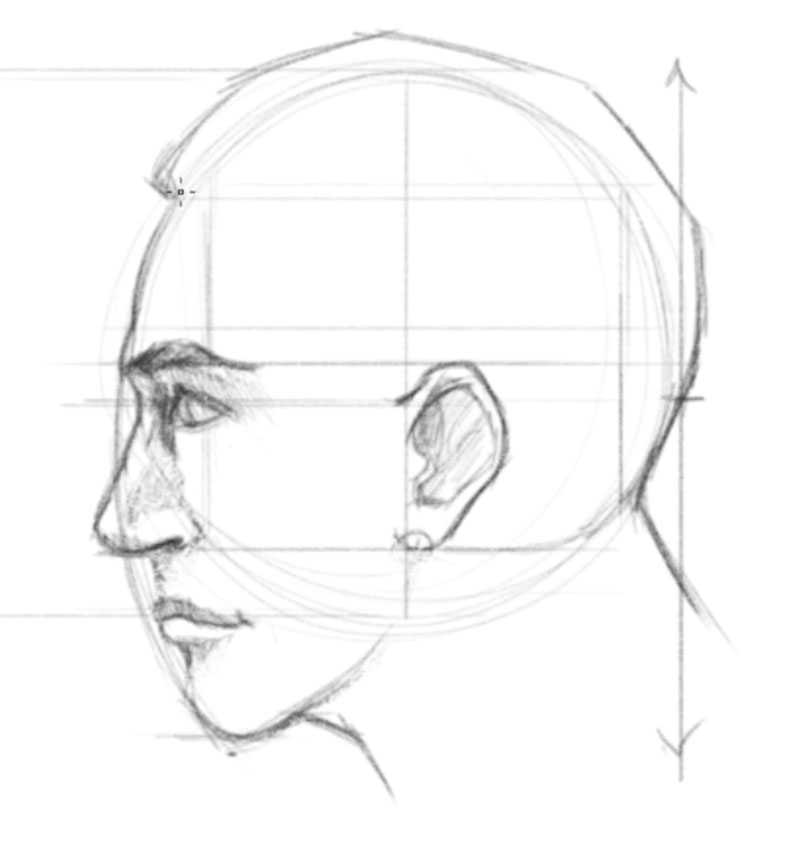
Step 7 - Add the Hair
Nosotros'll keep the hair style consistent with our first drawing and describe the hairline. In this instance, the line extends dorsum before making its style down to the ears.
Nosotros'll also add a few hints of shading to make the hair experience similar a course.
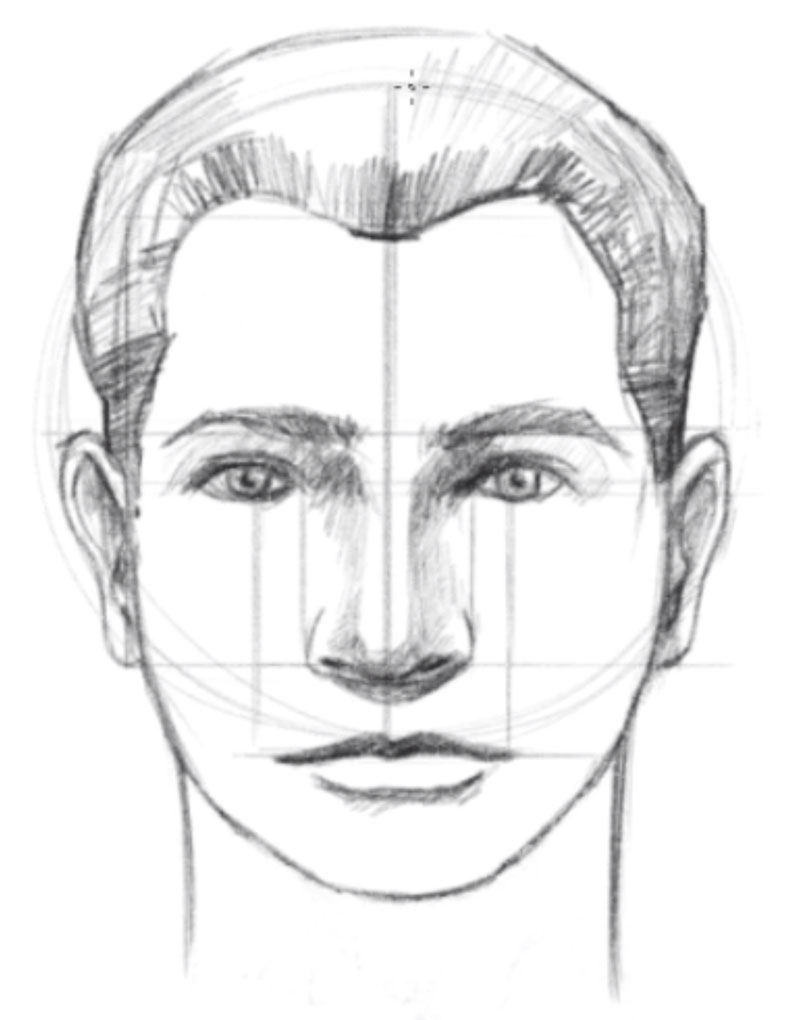
Summing Upward The Andrew Loomis Arroyo to Cartoon a Face
(Some of the following links are affiliate links which means we earn a pocket-sized commission if you buy at no additional cost to you.)
Andrew Loomis is revered for his step past step approach to cartoon heads. As we covered above, his approach divides the caput into manageable geometric shapes. Each feature on the face up has a specific location relative to the geometric configuration set upward in the early stages of the drawing process. Because this method is so accurate, it's peachy to use for drawing a caput from imagination.
Merely this approach is not limited to drawing faces from imagination. It also works when drawing a face up from ascertainment. We just have to keep in listen that every person is different and variations of these specific proportions volition exist noticed.
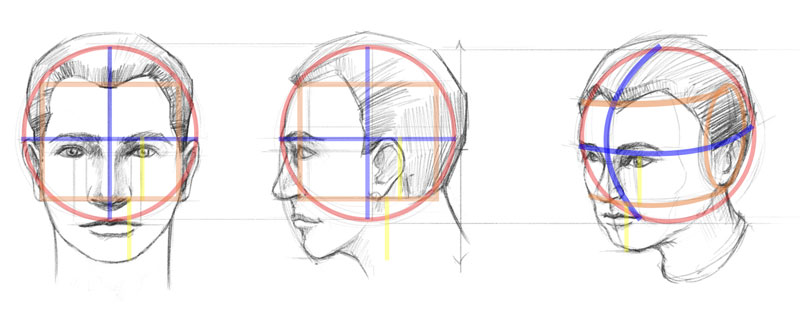
Here'due south a look at a face and head drawn from imagination using the Loomis approach combined with a simpler arroyo which we discuss a fiddling further down this page. All of the relationships and proportions are identified with the guidelines discussed.
For more on the Loomis method for drawing heads, check out Module 4 from the "Portrait Drawing The Smart Way" course or you lot can bank check out his book hither .

A Simple Arroyo to Drawing a Face
Some may find the Loomis Method a niggling cumbersome for drawing. Luckily, there is a simpler approach. This approach borrows ideas from the Loomis Method, but simplifies a few of the steps. This formula should be used to assistance you lot run across and compare. In each stage of the formula, analyze each feature and draw what y'all run across. The upshot volition be a representational portrait of the person yous are drawing with all of the features in the right place.
Drawing a portrait is very much similar drawing whatever other subject matter. Yous have to closely observe the subject in order to describe it accurately. Of grade portrait drawing is especially delicate considering the goal is to make the portrait resemble the subject area closely.
If you know the person, the pressure to produce accuracy can exist daunting. Simply every artist, no matter what their skill level, should take center. Even the most experienced and well-known portrait artists are presented with challenges. Consider these two quotes from i of the best portrait painters of all fourth dimension, John Vocalizer Sargent...
"Every time I pigment a portrait, I lose a friend."
"A portrait is a painting in which something is wrong with the mouth."
Most of us can chronicle with both of these quotes. We've all felt the pressure level when drawing or painting a portrait to go far look exactly like our subject - especially when that subject is a friend. For some of us, the pressure is so great, we avert portraits all together.
It's often hard to pinpoint a problem in a portrait. We can see that something isn't quite right, but finding the solution or the fix tin can actually throw some of us. Oft it'due south a combination of issues that lead to a "less than perfect" portrait. Maybe something "is wrong with the oral cavity".
Even though representational portrait drawing is reliant on good observation and accurate marker-making, nosotros can still follow a uncomplicated procedure that will lead to better results in our attempts.
Now, let's accept a expect at the simpler arroyo to cartoon a face up.
I've taken all of the steps to drawing a face with this simpler arroyo and put them into i image. The step by pace instructions can be found underneath the image. You'll notice that some of the steps are the same every bit we discussed before, with the exception of using the square to determine the hairline, brow line, and nose line.
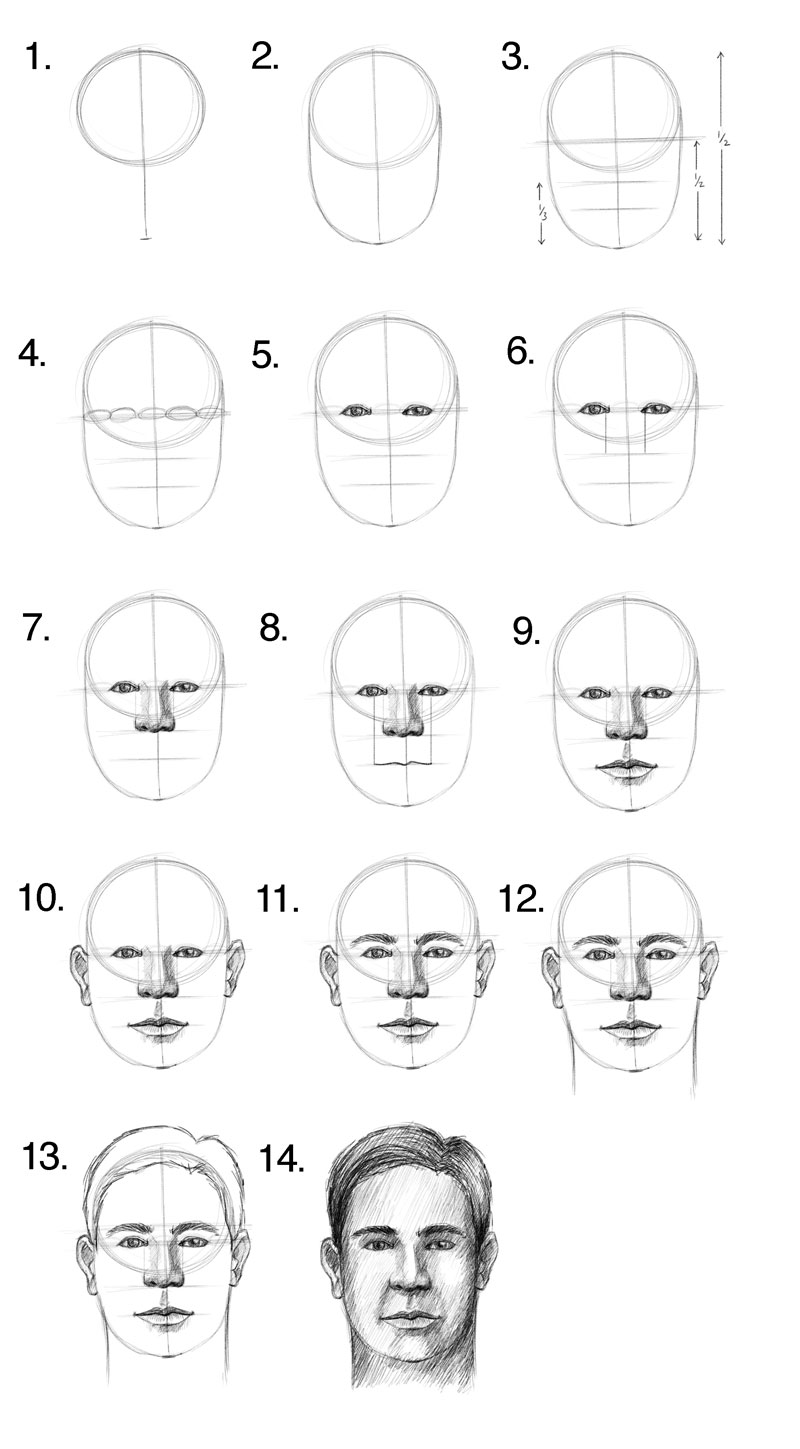
The first stride is to describe a circumvolve to correspond the cranium. Next, a line can be drawn to make up one's mind the length of the face (Footstep i). For most faces, this line should be approximately double the length of the original circle.
Side by side, lines are drawn from the bottom of that line to the edges of the circle creating the shape of the face (Step two). From here, we can locate the positions of the facial features.
The "centre" line is in the center of the face. (Your eyes aren't way up on your forehead, so resist the temptation to put them there.) A line is fatigued to stand for the eye line (Step three).
The "nose" line is found in the middle of the "heart" line and the bottom of the chin. When it comes to facial proportion, about noses volition terminate at this line (Footstep 3). All the same, there are exceptions to every rule. Some people take really long noses and some have really curt ones.
The oral cavity line is constitute approximately one-third of the way downward in between the nose line and the bottom of the chin. A line is loosely fatigued for its location (Step iii).
Next, we'll concentrate on the eyes. To notice the overall width of the eyes, draw 5 oval shapes across the center line. Most faces are well-nigh "5 eyes" wide. Obviously, people but have 2 eyes. The "five optics" but help to make up one's mind the width of the eyes (Step four).
Once nosotros know the width of the eyes are accurate, we can draw them in the proper location (Step 5).
Now, we'll determine the width of the nose. For most people, the width of the nose will align with the inside corners of the eyes. Nosotros can simply describe two lines down from the inside corners of the eyes to the olfactory organ line to find the relative width of the nose (Footstep 6).
In one case we know the width of the nose, nosotros can depict it in identify (Step 7).
Now, we can effigy the width of the mouth. This measurement varies from person to person, but for about folks, the width of the mouth aligns with the inside portions of the iris or the pupil. So, nosotros'll simply draw a line direct down from this location to the mouth line to discover the corners of the mouth. We'll describe a line here to indicate where the upper lip meets the bottom lip (Stride viii).
Then nosotros tin can draw the upper and lower lips, knowing that the rima oris is in the right spot (Pace 9).
Now for the ears. We'll extend the eye line out to determine the location where the top portion of the ears run into the head. They extend upward a bit and line up with the forehead line. The bottom of the ears conveniently align with the olfactory organ line (Pace x).
Once we have the ears in place, we can add the heart brows. We'll use the tops of the ears to make comparisons. For about people, the brow line aligns with the tops of the ears (Pace 11).
Before addressing the hair, we'll add a neck. The cervix extends down from the lesser of the ears. For females, this lines extends inward a bit - resulting in a smaller neck. For males, this line still comes in a bit, but to a bottom degree. It's nearly direct down from the bottom of the ears (Stride 12).
The shape of the hair is added side by side. In virtually cases, the hair extends off from the height of the cranium and may overlap portions of the brow (Step 13).
Lastly, shading is added to develop the illusion of form (Step 14).
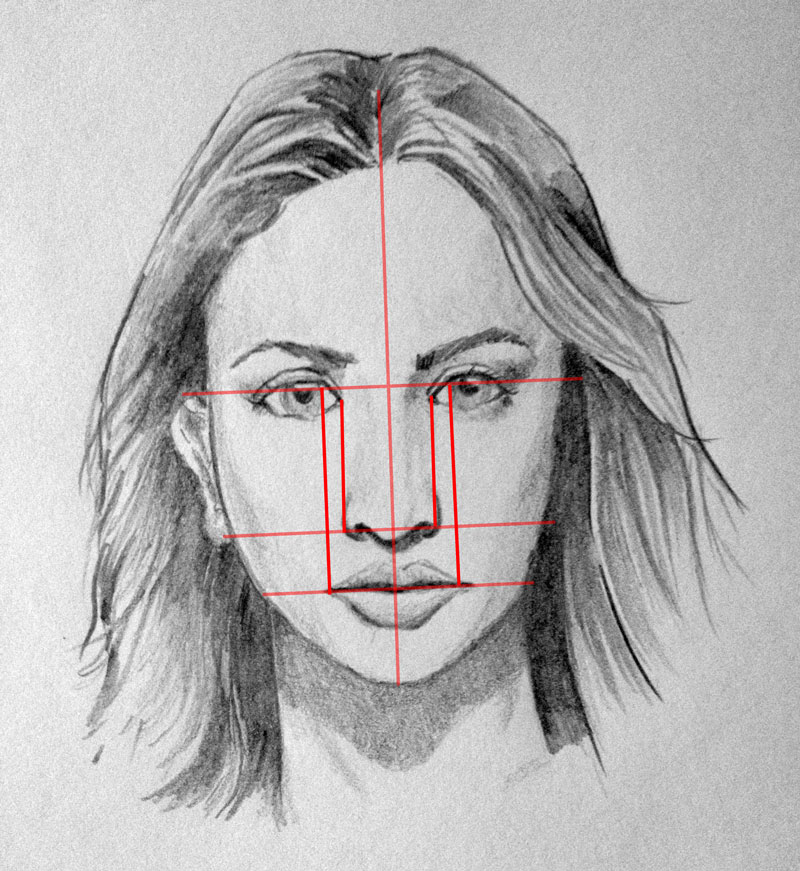
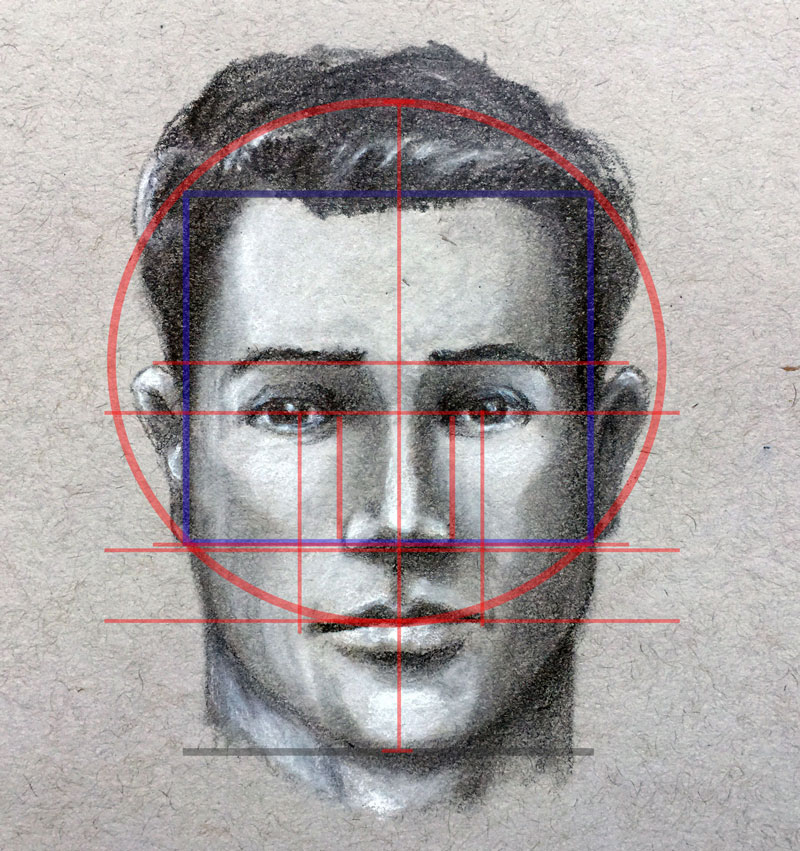
Reviewing the Generalized Locations of Facial Features
- The eyes are found in the middle of the head.
- The corners of the inside of the optics mostly line up with the edges of the olfactory organ.
- The "mouth" line is about one-third below the "nose" line and the lesser of the chin. This line represents where the top lip meets the bottom lip.
- The inside portions of the pupils or the iris more often than not line up with the corners of the mouth.
- The ears are usually found between the "eye" line and the "olfactory organ" line, but extend upwardly to the brow line.
When drawing faces, use these standards to aid you get your facial proportions correct. Retrieve, yous must look and written report your subject. While these standards apply to most of us, they exercise not apply to all of us.
Shading a Confront
Knowing where to identify the facial features is conspicuously of import, but in order to communicate a confront in a drawing, we'll also need to add some shading. Shading is simply the process of manipulating value (the darkness or lightness of a colour).
The course of the face up is developed though the use of value and tone. The relationships of specific values inform the viewer of the location and force of the light source. It is ultimately the behavior of light on the head which creates the illusion of form.
To better understand how light behaves, nosotros can consider the planes of the head and face. By breaking the face downward into simple planes, we tin improve comprehend how low-cal behaves.
When shading, information technology's helpful to call up of the head in terms of flat planes. We can see these planes illustrated beneath...
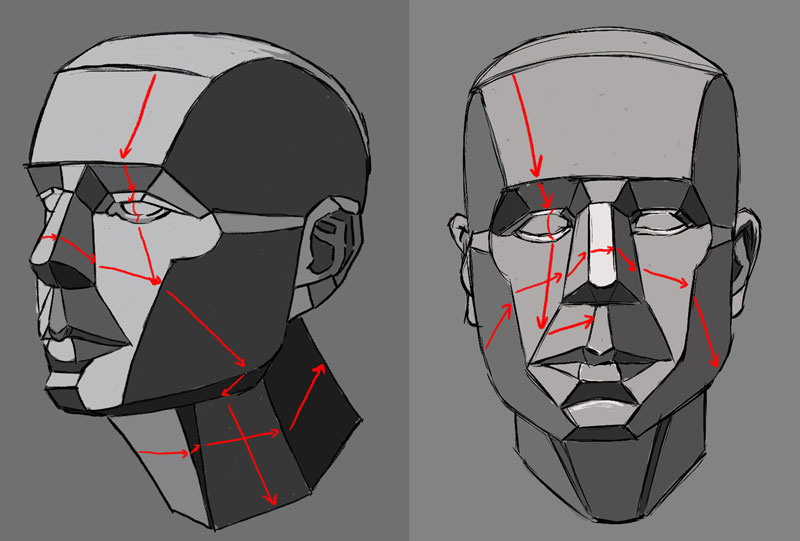
The planes of the face modify direction in space. These changes in direction produce different values depending on the location and strength of the calorie-free source. In near cases, the light source will originate from to a higher place. This produces areas of darker tone in locations that recede and lighter ones in locations that protrude.
This means that recesses around the eyes, nether the nose, bottom lip, and chin are generally shaded with darker values. Areas that protrude, such equally the nose, cheek bones, chin, and lower lip consist mostly of lighter values.
Well-nigh faces will have polish transitions or gradations from calorie-free to dark. Creating smooth transitions in value are essential for communicating the texture of pare.
How you lot arroyo shading a face will depend on the medium that you utilise to draw the face. For graphite, or pencil, you can merely adjust the corporeality of pressure that you place on the pencil. For very polish or subtle transitions, you may choose to use a blending stump.
Determination
When drawing a portrait, we have to remember that at that place's no "one size fits all" solution. There volition be slight proportional differences from one person to the next. We can use the techniques explored in this lesson to help us better understand the locations of the features of the face. But if we want our portrait drawings to capture the likeness of the person, then we must rely on ascertainment to capture all of the nuances.
Now that you know how to describe a face and the locations of the facial features, you can draw anyone that y'all wish. Just recall, noesis is simply part of information technology. Yous must practice in society to see the best results with your drawings.
Source: https://thevirtualinstructor.com/facialproportions.html
Posted by: autreysenessobling.blogspot.com
0 Response to "How To Draw Guide Lines For Face Makeup"
Post a Comment